As an Amazon Associate, I earn from qualifying purchases.
How to Use a Car Foam Sprayer at Home (Beginner-Friendly Guide for a Better Wash)
Contents
- 1 How to Use a Car Foam Sprayer at Home (Beginner-Friendly Guide for a Better Wash)
Washing your car by hand can feel like a chore, but it’s often the best way to keep your paint looking pristine. If you’ve ever admired the thick, snow-like blanket of soap covering cars in professional detailing videos, you know there’s a better way to wash than the old “bucket and sponge” method. That secret weapon is a foam sprayer.
A foam sprayer is a tool that mixes car shampoo, water, and air to create a rich lather that clings to your vehicle. It’s not just for show; this thick foam helps lift dirt and grime away from the surface before you even touch the paint. Learning how to use a car foam sprayer at home can elevate your weekend wash routine from a basic chore to a professional-grade detail, ensuring a safer, more effective clean.
Why Use a Car Foam Sprayer at Home?
Before diving into the mechanics, it helps to understand why this tool is a favorite among detailing enthusiasts. It isn’t just about making your driveway look cool; there are tangible benefits for your vehicle’s longevity.
Reduces Swirl Marks and Scratches
The biggest enemy of car paint is friction. When you scrub a dirty car with a sponge, you risk dragging tiny particles of dirt across the clear coat, creating those annoying spiderweb swirl marks. A foam sprayer coats the car in lubrication. The bubbles lift and encapsulate dirt particles, allowing them to slide off the paint safely.
Provides Even Soap Coverage
Dipping a mitt into a bucket often leads to inconsistent soap application. One panel might get a lot of suds, while another gets barely any. A sprayer ensures every inch of the vehicle, from the roof to the rocker panels, is saturated with cleaning agents.
Speeds Up the Cleaning Process
Pre-soaking with foam softens stubborn grime like bird droppings, bug splatter, and road tar. This means less scrubbing later on, saving you time and effort.
Professional Results at a Fraction of the Cost
Professional detailing can cost hundreds of dollars. By investing in a sprayer and learning the technique, you can replicate that high-end “snow foam” wash in your own driveway for pennies on the dollar.
How to Use a Car Foam Sprayer at Home (Step-by-Step)
Using a foam sprayer is straightforward, but following the right order of operations ensures you get the most out of your wash. Here is your step-by-step guide.
1. Prepare Your Equipment
Gather your foam sprayer (whether it’s a cannon, gun, or pump sprayer), your pressure washer or garden hose, and your preferred car shampoo. Ensure all connections are tight to prevent leaks.
2. Mix the Soap Solution
Check the instructions on your specific car shampoo. Most concentrated soaps require a dilution ratio, often around 1:10 (one part soap to ten parts water). Pour the soap into the canister first, then fill the rest with warm water. Warm water helps mix the solution better than cold water, preventing clumping at the bottom.
3. Pre-Rinse the Vehicle
Before foaming, give the car a thorough rinse with water. This removes loose dust, mud, and leaves. It also cools down the paint if the car has been sitting in the sun, which prevents the soap from drying too quickly.
4. Apply Foam Evenly
Connect the sprayer and start foaming. Start from the bottom of the car and work your way up. This prevents the soap from running down too quickly and ensures the lower, dirtier panels get plenty of dwell time. Cover the entire vehicle until it looks like it’s been hit by a blizzard.
5. Let the Foam Dwell
This is the most critical step. Let the foam sit on the car for 3 to 5 minutes. Watch as the foam turns from white to gray or brown as it pulls dirt off the paint. Do not let the foam dry on the car, as this can leave streaks. If it’s a hot day, you may need to rinse sooner.
6. Agitate with a Wash Mitt
For a maintenance wash on a relatively clean car, you might just rinse the foam off. However, for a proper clean, you should now hand wash the vehicle using the “two-bucket method” (one bucket for soap, one for rinsing your mitt). The remaining foam provides excellent lubrication for your mitt.
7. Rinse Thoroughly
Remove the foam sprayer attachment and switch back to your standard nozzle or hose. Rinse the car from top to bottom, ensuring all soap residue is removed from panel gaps, mirrors, and door handles.
8. Dry Safely
Never air-dry your car, as water spots can form. Use a large, plush microfiber drying towel to gently dry the surface. You can also use a leaf blower to force water out of crevices.
Best Foam Sprayer Options: Which One is Right for You?
Not all sprayers are created equal. The right choice depends on your existing equipment and budget.
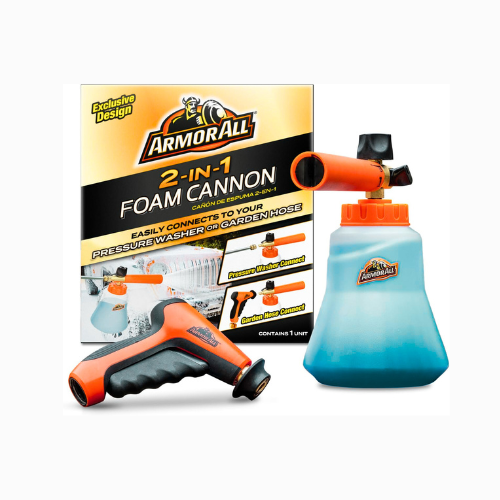
Foam Cannon
Best for: Pressure washer owners.
A foam cannon attaches to a pressure washer wand. The high pressure (usually requiring at least 1100 PSI) creates the thickest, shaving-cream-style foam.
- Pros: produces the best foam; uses less soap per wash.
- Cons: requires a pressure washer; higher initial setup cost.
Foam Gun
Best for: Garden hose users.
If you don’t have a pressure washer, a foam gun attaches directly to a standard garden hose. It uses water pressure to mix the soap.
- Pros: easy to use; no special machinery required; affordable.
- Cons: foam is runnier and less thick than a cannon; uses more water.
Pump Sprayer (Handheld)
Best for: Apartment dwellers or spot cleaning.
These are manually pressurized canisters (like a garden pesticide sprayer but modified for foam). They are great if you don’t have access to a hose.
- Pros: portable; no hose needed.
- Cons: requires manual pumping; smaller capacity; only suitable for one panel at a time or small vehicles.
Tips for Getting the Thickest Foam
If your foam looks more like watery milk than shaving cream, try these tips to improve your results.
- Choose the Right Soap: Not all car soaps are designed for foaming. Look for “Snow Foam” or “High Suds” shampoos specifically formulated for sprayers.
- Use Warm Water: As mentioned earlier, mixing your solution with warm water helps activate the foaming agents in the soap.
- Adjust the Air Intake: Most foam cannons have a knob on top. This controls how much air mixes with the solution. Turn it to the negative (-) or “less air” side to suck up more soap, which usually results in thicker foam.
- Check PSI/GPM: If you are using a foam cannon, ensure your pressure washer meets the minimum requirements. Generally, you need at least 1.5 GPM (gallons per minute) and 1100 PSI for decent foam.
- Maintenance: After every use, run clean water through the sprayer to flush out soap residue. Dried soap can clog the internal mesh filter, ruining performance over time.
Elevate Your Car Wash Game
Mastering how to use a car foam sprayer at home is one of the best upgrades you can make to your car care routine. It creates a safer washing environment by lubricating the paint, effectively lifting dirt, and reducing the risk of scratches. Plus, it’s undeniably satisfying to watch the thick foam slide off your car, taking the grime with it. Whether you opt for a high-powered cannon or a simple hose attachment, the key is proper technique and patience. Your car’s paint will thank you for it.
Frequently Asked Questions
Do I need a pressure washer to use a foam sprayer?
No, you don’t. While a pressure washer is required for a foam cannon, you can use a foam gun that attaches directly to a standard garden hose. However, the foam produced by a garden hose gun will be thinner and runnier than the thick foam produced by a pressure washer cannon.
Can I use any car soap in a foam sprayer?
Technically yes, but results will vary. Standard car wash soaps might produce runny foam that slides off too quickly. For the best results, use a shampoo specifically labeled as “Snow Foam” or “Foaming Car Wash,” as these contain surfactants designed to create thick, clinging suds.
How long should I let the foam sit before rinsing?
You should let the foam dwell for about 3 to 5 minutes. The goal is to let it sit long enough to break down dirt but rinse it off before it dries. If the foam dries on the paint, it can leave difficult-to-remove spots and streaks.
Why isn’t my foam thick enough?
Thin foam can be caused by a few factors: using too much water and not enough soap in your mixture, using cold water, or having a pressure washer with insufficient GPM (gallons per minute). Also, check the air intake knob on your cannon; it may need adjustment to draw more soap into the stream.
Can a foam sprayer damage my car’s paint?
The sprayer itself will not damage your paint. In fact, it protects it by adding lubrication. However, using a pressure washer too close to the paint (closer than 6-12 inches) or using an overly aggressive chemical cleaner in the sprayer can cause damage. Always use automotive-safe soaps and keep a safe distance.

As an Amazon Associate, I earn from qualifying purchases.